Here's a few pics of our footings being poured. You can see the Form-A-Drain, stay-in-place footing forms. Instead of laying drain tile along the footings, the forms are hollow channels and stay in place. It's a neat product. I was impressed with the little orange caps on the rebar - required by OSHA so that no one gets hurt.
The first load of concrete arrives!
Installing the rebar . . .
Saturday, May 27, 2006
Wednesday, May 24, 2006
Movin' on up
Yesterday the exavator finished the foundation dig, and Kenny just called to tell me that we passed our footing inspection this morning! The electric company was also able to come out and hook up service to our temp. elec. pole - so our foundation contractor is set. Kenny said he should have footing forms in today and we've got concrete coming tomorrow.
We're using concrete with about 20% fly-ash - a waste byproduct of coal-burning at electric power plants. (The last I heard, it was 18%, but Kenny was calling them back to see if we could increase the percentage of fly-ash). Concrete is made from Portland Cement, aggregate, and water. Since all of the electric power around here is produced by burning coal, we have plenty of fly-ash, so you can request that concrete mixers use fly-ash instead of a portion of the portland cement (which is not a very environmentally-friendly product). It makes the concrete stronger and is a much more environmentally responsible choice, but increases the curing time slightly.
Kenny is stopping by the site today after work to meet with a new plumber. Our last plumber just pulled out on us. He was kind of helping us on the side, but now his regular boss doesn't want him doing that. I guess he wants us to hire the company instead, but we can't do that because the company's not licensed in OH, just KY. So anyway, now we're getting a bid from a new plumber who also works on the side, but I think is licensed in OH. Kenny really wants to help with the plumbing, but doesn't feel comfortable doing the stub plumbing in the foundation, so we're hoping we can get someone who will accommodate how we want to work the whole thing. The rainwater catchment system is also an issue for some people, since there's a little extra plumbing work with labeling, tagging, and so on. We still can't decide between PEX or copper - I suppose we'll go with whatever the plumber we hire wants to use.
Kenny is also going to spray a portion of the lot with a short-life herbicide to kill off the existing weeks. We'll have to keep doing this every 6 weeks or so until winter, and then we'll be able to plant our new native landscaping in the spring. (Hopefully we'll be finished with construction by then!) We will be keeping the majority of our 2 acre lot wooded, and then a small portion will be a native wildflower prairie. The rest, close to the house, will be a low maintenance, low-mow grass mix that only requires mowing once or twice a season. It's a more natural, longer lawn, but it eliminates the mowing, watering, fertilizing, and so on. We will also have native trees and landscape beds near the house.
That's about all for now - sorry no pics. Kenny's taking the camera tomorrow to get some stills of the concrete pour, so I'll have some to post shortly. We'll be attending a wedding in Columbus this weekend, so we won't get much done at the site - and it's supposed to be nice weather too! I hate to wish rain on anybody's wedding, but MAN, it would be a lot easier on me if it were raining, because any nice day we get, I feel like I should be there doing something! I'm getting really restless having to stay home with the kids and work online. Kenny is seeing the progress day by day, and I only get there once a week. I guess that's why we really want to get out of our house and into an apartment that's closer. Our current house has been online at www.forsalebyowner.com for almost 3 days now and no calls yet. Although according to the site, we've had 85 hits. Hmmm, did we over price??? Too early to second-guess yet I think. Well, take care, and I'll keep you posted on all sides of the issues. Thanks for reading!
Sunday, May 21, 2006
Put the diving board on hold
Four hours later and our hole is mostly dry. The excavator has about a foot more to dig and then the foundation contractor can begin placing the Form-A-Drain footing forms. The kids were great, they played in the truck while we pumped out the water. We were able to take a walk and meet some of our new neighbors and the kids' new babysitter, so that was fun. Anyway, enjoy the after pics of our almost dry hole! (Man this is exciting).
A House or a Swimming Pool?
Remember when I wrote that we were getting some rain? Well as you can see below we spent our Saturday with a rental pump trying to figure out if we really needed a house, or if a pool would be good enough? I'll post some "after" pictures above, but the "befores" are below. In some spots, we had about 24"-36" of water. We wanted to get the water out so that final excavation on the foundation could be finished up on Monday and the footing forms can start to be placed on Tuesday.
The picture to the left shows Kenny at the top of a huge pile of dirt. You can't see it, but he's leaning on his shovel, exhausted as you can imagine, after digging that huge hole.
Above you can see the pump in the water - along the right edge of the hole.
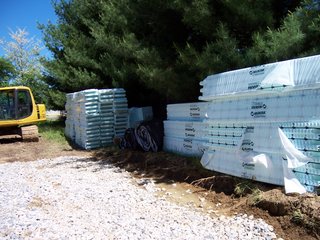
Here we have some pics of the electric temp pole and some of the foundation materials that were delivered to the site on Friday. Left is the ICF foundation forms, and below is the Form-A-Drain stay-in-place forms for the footings. They stay in place and become the drainage channel around the perimeter of the footings.
Friday, May 19, 2006
Temp Pole Inspection & Progress Pics
Here are some of the latest progress photos and get ready to celebrate once more . . . we passed our temporary electric pole inspection today (Kenny wants me to stress that it passed on the FIRST try)! From the pics you can see it been a little wet lately, but Kenny's been braving the weather and building the temp pole per the county's requirements anyway. With Brian's help, he was able to get everything completed and inspected before the rain today. (Apparently, they had to drive a rod into the ground 8 feet, but I haven't watched the video yet, so I'll believe it when I see it).
Tomorrow, the Nudura Insulated Concrete Foundation forms (ICF) and Form-A-Drain footing forms are being delivered to the jobsite. Weather permitting, work on the footings will begin early next week - I'm beginning to hate weekends . . .
Enjoy the pics - it may not look like much to you, but at least it's progress!
Monday, May 15, 2006
A Lesson on Passive Solar Design. . .
While I have some time (the rain has slowed excavation, and Kenny is building and installing the temporary electric pole), I thought I'd post a little information about Passive Solar design. There are many great resources out there about Passive Solar design. Check online or your local library. One book I found very helpful was Daniel Chiras' "Solar Home" and also, his "New Ecological Home." There are also many websites based in Austrailia that are helpful, but remember to reverse their information because they are in the southern hemisphere - so when they refer to passive solar gain from the north, remember, for us in the northern hemisphere our solar gain is from the south. These guidelines are generally to maximize winter passive solar gain and minimize summer gain. This works for cold or temperate climates. For those in hot climates with no need for winter passive solar gain, an opposite approach may be best. Anyway, here's a quick break down:
Building Proportions and Solar Orientation:
For best results, rectangular buildings yield the best results for passive solar gain and passive cooling You can get the specific proportion recommendations from a number of sources, but generally the building must be longer in the east-west direction than in the north-south direction. A building oriented true south or within 15-degrees of true south will provide the best results. (Keep in mind that true south and magnetic south are different! You'll need to research and find how many degrees away true south is from magnetic south. In my area, true south is about 5 degrees off from magnetic south).
So we've established that a rectangle with the long sides facing true north and south work best. You also need to make sure that you have no solar obstructions such as large trees, other buildings, or obstacles toward the south side. Depending on your location, a few deciduous trees to the south east and south west are ok and assist in summer cooling - this is especially helpful in warmer temperate climates, but for cold northern climates, you want to minimize solar blockage. In all climates trees due east and west are a good idea to help block low angle sun and glare. Coniferours trees to the north create protection from winter winds.
Window Selection and Building Envelope Efficiency:
Your window selection and efficiency of your building envelope are both very important. In passive solar construction, window selection will be based on location. Windows on the north, east, and west sides should be as efficient as possible with a low-e coating to block the sun's rays. We can talk window specifics another time, but for now just know that low-e on three sides is ok. For the south side windows, however, you WANT to let in the heat, so you need windows that permit heat gain, but are still energy efficient and don't let heat out of your home. These are hard to find and can be the priciest part of the design. Your exterior walls also need to be very energy efficient and sealed well to prevent air infiltration and leakage. This is done through sealing, insulation, and building wraps. The more efficient your envelope is, the more effective your passive solar design will be. You will want most of your windows on the south side. Depending on if you are doing a sun-tempered design, a direct gain design, a sun space, or a trombe-wall (see the books I referenced above for more detai on these) - you will determine the amount of windows on each side. Our design is a Direct Gain design, so our total sqare footage of south-facing glazing is equal to about 8-9% of our total conditioned floor sq footage. For the north, east, and west sides, the windows make up about 2% on each side.
Thermal Mass:
Thermal Mass is the means of retaining or storing the sun's heat in your house until it's needed. You see, the sun's rays coming in the window heat not only the air, but also the objects in your house. For example, you want something in your house, that will attract and hold the heat for long periods of time, so that when the sun goes down, that object stays warm and releases its heat back out into the room. Metal for example is a poor choice because it heats up and cools down very quickly. The thermal mass in our home will be provided by our suspended concrete floor. (More specifics on that later, but here's why we need it). Our main level floors will be 3"thick reinforced concrete floors (with some "beam" areas as thick as 11"). The sun will shine through the windows and be absorbed by our concrete floors. The air will be heated slightly, but the excess heat will be absorbed into the conctete slab. Then after the sun goes down and the air in the room begins to cool, the concrete will then begin releasing heat into the air in an attempt to gain an equallibrium in temperature between the concrete surface and air. The amount of thermal mass in a passive solar home is important - otherwise the heating will not be effective, and there is a huge risk of summer overheating. There are mathematical calculations and formulas to determine the glass to mass ratio that will be most effective. So as you can see, thermal mass is very important not only to passive solar heating, but also to passive cooling in summer.
Passive Cooling:
In summer, the thermal mass absorbs excess heat from the air during the day, and then is purged from the space at night by opening windows and flushing out the heat with fans or simply the "chimney effect". Additionally, passive cooling uses landscaping to shade and cool the exterior of the home. Our home also incorporates exterior sunshades to block the sun's high angle rays in summer, while still allowing the sun's low-angle rays to enter the windows in winter.
Goals:
So based on all of the principles above, our goal is provide at least 60% of our total heating requirement from the sun - thus reducing our fossil-fuel heating consumption (and heating bill) by the same 60% (based on the usage by a similarly sized, traditionally built - non-passive solar - house in our area).
While passive solar design is not as complicated as some may think, there are still some specific requirements that are important to keep in mind. I'm sure there is more that I could go into, but I just wanted to give a brief overview. For those who are interested in more of the intricacies of passive solar design, I urge you to go online or consult the books I mentioned above to study this ancient practice in more detail.
Remember, only since the dawning of the Industrial Revolution in the late 1800s and early 1900s, did humans begin to approach the world with an attitude of "conquer with force." As William McDonough says, the human race's motto appears to be "If brute force doesn't work, you're not using enough of it." In a sense, we began to think that if it's too hot, just turn up the AC - don't worry about anything else. And for those of us who don't realize that we are ALL burning fossil fuels for our heating systems - it's time for a wake-up call. I actually had a student who told me that her heating system was very environmentatl - her home had electric baseboard heaters and there was absolutely no pollution emitted from her baseboards. (I guess she's never been to her local coal-burning power plant that provides her electricity).
For centuries prior to the Industrial Revolution, humans worked WITH the environment to provide for comfort, heat, cooling, etc. It can be done - quite easily actually - and the goal of our house is to show you how. Thanks for reading!
Friday, May 12, 2006
And Now . . . A Big Hole
Well, we were forced to cancel the groundbreaking because the kids were both sick, so we went ahead without any fanfare. As you can see from the images, we now have a gravel driveway and a big darn hole. Our exavator will be done by late this week or early next week, and then our foundation contractor will take over and begin work on the footings.
We had planned on running the underground water line and sewer line back before the driveway went in, but we had too much rain and the ground wouldn't hold the dump-trucks full of sand and gravel necessary to run the line. So we put the driveway in first, and the sewer line and water line will have to be dug carefully (and closely) next to the drive later after the house is framed and under roof.
We've put our current house on the market - for sale by owner. It will be in the paper this weekend and online at cincinnati.com for a week. We're also putting it in our small local paper, so we'll keep you updated on how the sale of this house goes too! Understandably, we've been really busy and haven't had much time to write here online, but I'll try to do better!
Our next step, while the footings and foundation are going in, will be to apply for our zoning variance for the driveway. The zoning ordinance requires a "hard surface" - asphalt or concrete, but for environmental reasons, we'd prefer to keep it gravel. We'll let everyone know how it goes! Until next time . . .
Subscribe to:
Posts (Atom)